
You’re in the home stretch of the First Aid merit badge! In this final part of my guide, I’ll be walking you through requirements 10 through 15, covering patient transport, heat and cold emergencies, mental health, miscellaneous conditions, teaching first aid, and exploring careers in emergency medicine.
You’ve reached Part 3 of my ultimate guide to the First Aid merit badge! If you haven’t already, check out Part 1 (requirements 1-4) and Part 2 (requirements 5-9) for the earlier sections of this badge.
If you’ve just come over from Part 2, congratulations! You’ve already tackled breathing emergencies, loss of consciousness, CPR, fractures, and spinal injuries. Those are some of the toughest first aid skills out there, and you should be proud of how far you’ve come. 😀
These final requirements round out your first aid training with practical skills like transporting patients, handling heat and cold conditions you’ll encounter on campouts, and learning how to teach first aid to others using the EDGE method. Let’s finish strong!
What Are The First Aid Merit Badge Requirements 10-15?
- Moving a Patient. Do the following: (a) Describe the conditions under which an injured person should and should not be moved. (b) If a sick or an injured person must be moved, tell how you would decide the best method. Demonstrate these methods. (c) By yourself and with a partner, demonstrate how to transport a person from a smoke-filled room. (d) By yourself and with a partner, demonstrate how to transport a person with a sprained ankle for at least 25 yards. (e) With helpers under your supervision, improvise a stretcher and move a presumably unconscious person for at least 25 yards.
- Heat- and Cold-Related Conditions. Describe the symptoms and signs of, show first aid for, and explain prevention of these conditions: (a) Dehydration and over-hydration (b) Heat cramps and muscle pain after exertion (c) Heat exhaustion (d) Heat stroke (e) Chest pains associated with cold exposure (f) Hypothermia.
- Mental Health Conditions. Describe the following: (a) Reactions associated with at least three stressful situations. (b) The actions that you and others should take to prepare for and manage these situations. (c) The indications that someone might be a danger to themselves or others. (d) The actions that you should take if you suspect that someone might be a danger to themselves or others.
- Miscellaneous Conditions. Describe the symptoms and signs of, show first aid for, and explain prevention of: (a) Object in the eye (b) Broken, chipped, loosened, or knocked out tooth (c) Vomiting and diarrhea associated with food poisoning (d) Abdominal pain (e) Stroke.
- With guidance from your counselor, develop a plan to teach a first-aid skill or topic using the EDGE method. Discuss your skill, topic, and plan with your counselor, and then teach your skill or topic to your family or to one or more Scouts.
- Do ONE of the following: (a) Visit an emergency medical station house or training center. (b) Interview an emergency medical services professional. (c) Identify three career opportunities in emergency medical services. (d) Identify how you might use EMS skills for a personal hobby or healthy lifestyle.
Moving a Patient (Requirement 10)
10a) Describe the conditions under which an injured person should and should not be moved.
One of the most important rules in first aid is this: do not move an injured person unless you absolutely have to. Moving someone can worsen fractures, spinal injuries, and internal bleeding. In most situations, the safest thing to do is keep the patient still, treat what you can, and wait for EMS to arrive with proper equipment.
That said, there are specific situations where moving the person is the right call. The American Red Cross identifies three main reasons to move a victim:
- Immediate danger threatens their life or yours (fire, rising water, a collapsing structure, toxic fumes, or an active threat).
- You need to reach another person who requires more urgent medical attention.
- Proper first aid requires it. For example, CPR must be done on a firm, flat surface. If the person is on a bed or soft ground, you may need to move them.
My Scout Tip: If you must move someone, always protect their head, neck, and spine. If they are conscious, tell them what you are about to do and ask for their cooperation. Getting the victim out of danger takes priority, but move them as carefully and as short a distance as the situation allows.
10b) If a sick or an injured person must be moved, tell how you would decide the best method. Demonstrate these methods.
The best method of moving a patient depends on several factors: the person’s size and weight, the type and location of their injury, how far you need to move them, how many helpers you have, and the terrain. The guiding principle is always to choose the method that causes the least additional harm.
| Situation | Recommended Method | When to Use |
|---|---|---|
| Solo, conscious victim, short distance | Walking assist (support under their arm) | Victim can bear some weight; you need to get them to safety quickly |
| Solo, unconscious victim, immediate danger | Clothes drag or blanket drag | Fire, toxic fumes, or other urgent hazard; drag them by their clothing or on a blanket, keeping their head protected |
| Two rescuers, conscious victim | Two-person carry (seat carry or extremity carry) | Victim can’t walk but is alert; you have a partner to share the weight |
| Multiple helpers, unconscious victim | Improvised stretcher or log roll onto a backboard | Long distance transport; suspected spinal injury; need stability |
Check out this animated video (2:29) that demonstrates several common emergency carry techniques:
Practice Idea: With the help of your troop, set up a relay race at a campout where each patrol practices a different carry technique. This is what my troop did, and it was a really fun and effective way to learn these skills!
10c) By yourself and with a partner, demonstrate how to transport a person from a smoke-filled room.
In a smoke-filled room, the most dangerous air is near the ceiling. Smoke and toxic gases rise, so breathable air stays closest to the floor. Stay as low as possible. Crawl on your hands and knees, and keep your mouth covered with a wet cloth if you can.
If the victim is conscious, have them crawl alongside you toward the nearest exit. If they are unconscious or unable to move, use a clothes drag: grab the victim’s collar or the back of their shirt and drag them along the floor, keeping both of you as low as possible. With a partner, one person can grab under the arms while the other lifts the feet. Always move toward fresh air as quickly as you safely can.
Safety First: Remember from Part 1: always assess the scene first. If the smoke is too thick to see through, the floor is extremely hot, or flames are blocking your path, do NOT enter the room. Call 911 and let professional firefighters handle the rescue. You can’t help anyone if you become a victim too.
10d) By yourself and with a partner, demonstrate how to transport a person with a sprained ankle for at least 25 yards.
A sprained ankle is one of the most common injuries on the trail, and knowing how to help a fellow Scout get back to camp is a practical skill you will use. If the person can bear some weight, a walking assist works well: stand on the injured side, drape their arm over your shoulder, and support their waist with your other hand. Have them hop on their good leg while you bear part of their weight.
With a partner, the job gets much easier. Each of you stands on one side of the victim. Both of you drape one of their arms over your shoulders while supporting their back. The injured person keeps weight off the bad ankle and “walks” using you both as human crutches. For 25 yards, keep a steady pace and communicate clearly about turns and obstacles.
Pro Tip: If a walking assist isn’t possible (the pain is too severe or the terrain is rough), consider a piggyback carry for a lighter person, or a seat carry with a partner. On the trail, a trekking pole or sturdy branch can also serve as an improvised crutch. Wrap the sprained ankle with an elastic bandage or a cravat before transporting to reduce swelling and provide stability.
10e) With helpers under your supervision, improvise a stretcher and move a presumably unconscious person for at least 25 yards.
An improvised stretcher is the safest way to transport an unconscious person over any distance. You can make one from materials you’d find at almost any Scout campsite. The most common method uses two sturdy poles (trekking poles, branches, tent poles, or broomsticks) and a blanket, sleeping bag, or tarp.
- Lay the blanket flat on the ground and place one pole about one-third of the way across.
- Fold the short side of the blanket over the pole, then lay the second pole on top of the folded fabric, about six inches from the edge.
- Fold the remaining long side of the blanket over the second pole. The victim’s weight will hold the folds in place.
- Carefully log-roll the patient onto the stretcher (supporting head, neck, and spine). Secure them if possible.
- Lift on a count of three. Bearers at the head and foot should face forward. Bearers on the sides face the direction of travel.
When you carry the stretcher, keep it as level as possible. Walk in step (start with the same foot) to prevent rocking. If going uphill, carry head-first. If going downhill, carry feet-first. Communicate constantly with your team.
No blanket available? You can make a stretcher by threading the poles through the sleeves of two buttoned-up jackets or heavy coats. Turn the jackets inside-out over the poles so the zippers face down. This creates a surprisingly strong platform. Practice this at a troop meeting so you can do it quickly under pressure.
Heat- and Cold-Related Conditions (Requirement 11)
Heat and cold emergencies are some of the most relevant first aid topics for Scouts. Whether you’re hiking in the summer heat or camping in freezing temperatures, knowing how to recognize and treat these conditions can prevent a minor problem from becoming a life-threatening emergency.
11a) Describe the symptoms and signs of, show first aid for, and explain prevention of dehydration and over-hydration.
Dehydration occurs when your body loses more fluid than it takes in, and it’s the most common heat-related problem Scouts face on the trail. Symptoms include a flushed face, dry mouth, lack of sweat despite heat, dark yellow urine, dizziness, headache, fatigue, and weakness. In severe cases, dehydration can cause dangerously low blood pressure, rapid heartbeat, and fainting.
First aid is straightforward: have the person rest in a cool, shaded area and slowly sip water or an electrolyte drink. The key word is “slowly.” Chugging large amounts of water at once can lead to the opposite problem.
| Condition | Cause | Key Symptoms | First Aid |
|---|---|---|---|
| Dehydration | Not enough fluid intake; excessive sweating | Dry mouth, dark urine, dizziness, fatigue | Rest in shade, sip water/electrolytes slowly |
| Over-hydration (Hyponatremia) | Drinking too much water too fast, diluting sodium | Nausea, headache, confusion, swelling, seizures | Stop drinking water, eat salty snacks, seek medical help if severe |
Over-hydration (hyponatremia) is less well-known but equally dangerous. It happens when you drink so much water that your blood sodium levels become dangerously diluted. Symptoms include nausea, headache, confusion, and in severe cases, seizures. If you suspect over-hydration, stop fluid intake, provide salty snacks, and seek medical attention for any serious symptoms.
Prevention: Drink water consistently throughout the day, not just when you feel thirsty. A good target on the trail is about 6-12 ounces every 15-20 minutes during activity. Balance water with electrolyte-rich drinks or salty snacks, especially on long hikes. The CDC’s heat-related illness page has excellent guidance on staying hydrated safely.
11b) Describe the symptoms and signs of, show first aid for, and explain prevention of heat cramps and muscle pain after exertion.
Heat cramps are painful, involuntary muscle spasms that typically occur during or after intense physical activity in the heat. They most commonly affect the legs, arms, and abdomen. The cramps are caused by a combination of dehydration and loss of electrolytes (especially sodium and potassium) through sweat. On a hot summer campout, you might see Scouts getting cramps during a strenuous hike or a game of capture the flag.
To treat heat cramps, have the person stop activity and rest in a cool area. Give them water or an electrolyte drink and have them gently stretch and massage the cramped muscle. Applying a cool, damp cloth to the affected area can also help. Most cramps resolve within 15-30 minutes with rest and fluids.
Prevention: Stay hydrated before, during, and after activity. Eat foods rich in potassium and magnesium (bananas, trail mix, oranges). Warm up before exercise and avoid pushing through muscle pain, which is your body’s signal that something is wrong. If cramps keep coming back despite hydration, it could signal a more serious electrolyte imbalance that needs medical attention.
11c) Describe the symptoms and signs of, show first aid for, and explain prevention of heat exhaustion.
Heat exhaustion is the body’s warning that its cooling system is being overwhelmed. It’s more serious than heat cramps and can progress to heat stroke if not treated promptly. According to the Mayo Clinic, there are two main types: water depletion (causing intense thirst, headache, and weakness) and sodium depletion (causing nausea, muscle cramps, and dizziness).
Symptoms include heavy sweating, pale or clammy skin, fast and weak pulse, nausea or vomiting, fatigue, dizziness, and headache. The person may feel faint or collapse. The key distinction from heat stroke is that the person is still sweating and their body temperature is below 104 degrees Fahrenheit.
- Move the person to a cool, shaded area or an air-conditioned space immediately.
- Have them lie down and elevate their legs slightly.
- Remove excess clothing and apply cool, wet cloths to their skin or mist them with water.
- Give them small sips of cool water or an electrolyte drink if they are conscious and not vomiting.
If symptoms don’t improve within 30 minutes, or if they get worse at any point, call 911. Heat exhaustion can escalate to heat stroke quickly. The person may be sensitive to heat for several days afterward, so avoid strenuous activity in warm conditions until they’ve fully recovered.
11d) Describe the symptoms and signs of, show first aid for, and explain prevention of heat stroke.
Heat stroke is the most dangerous heat-related illness and a true medical emergency. It occurs when the body’s core temperature rises above 104 degrees Fahrenheit and the cooling system stops working entirely. According to the Cleveland Clinic, cooling the body within 30 minutes of onset can lower the death rate from over 50% to less than 5%. Speed matters enormously here.
The critical difference between heat exhaustion and heat stroke: a heat stroke victim often stops sweating even though they’re overheating. Their skin becomes hot, red, and dry. Other symptoms include throbbing headache, confusion, slurred speech, rapid and strong pulse, nausea, loss of consciousness, and seizures.
Call 911 immediately for any suspected heat stroke. While waiting for help, move the person to the coolest available location. Immerse them in cold water if possible (a stream, lake, or bathtub). If immersion isn’t available, apply ice packs to the neck, armpits, and groin, and fan them aggressively while misting with cool water. Do not give them fluids to drink, as they may be too confused to swallow safely.
Prevention: Stay hydrated, wear lightweight and light-colored clothing, take frequent breaks in the shade during hot weather, and avoid strenuous activity during the hottest part of the day (10 AM to 4 PM). Check on fellow Scouts regularly, especially those who are less experienced with heat. The National Weather Service’s heat illness guide is an excellent reference.
11e) Describe the symptoms and signs of, show first aid for, and explain prevention of chest pains associated with cold exposure.
Cold exposure can cause chest pain in two main ways.
- First, breathing in very cold air can cause the airways to spasm, producing sharp chest tightness. This is especially common in people with asthma or other respiratory conditions.
- Second, cold temperatures cause blood vessels to constrict, which increases blood pressure and makes the heart work harder. In people with underlying heart conditions, this extra strain can trigger angina (chest pain from reduced blood flow to the heart) or even a heart attack.
If someone experiences chest pain in cold weather, take it seriously every time. Move them to a warm environment, have them rest, and loosen any tight clothing. If the pain is from cold air irritation, warming up and breathing through a scarf or balaclava usually helps. If the pain is severe, does not improve with warming, or is accompanied by shortness of breath, nausea, or pain radiating to the arm or jaw, call 911 immediately, as these could be signs of a cardiac event.
Prevention: In cold weather, breathe through a scarf or neck gaiter to warm the air before it hits your lungs. Dress in layers, stay dry, and avoid sudden bursts of intense activity (like shoveling heavy snow) in extreme cold. If you have asthma, keep your rescue inhaler accessible during winter activities.
11f) Describe the symptoms and signs of, show first aid for, and explain prevention of hypothermia.
Hypothermia occurs when the body’s core temperature drops below 95 degrees Fahrenheit. It’s a serious risk on cold-weather campouts, especially when Scouts get wet from rain, sweat, or water crossings. An easy way to spot the early signs is to remember the “Umbles”: the victim stumbles, mumbles, fumbles, and grumbles. They may seem clumsy, confused, and irritable.
| Stage | Core Temp | Symptoms |
|---|---|---|
| Mild | 95-90 degrees F | Shivering, cold skin, confusion, poor coordination, fatigue |
| Moderate | 90-82 degrees F | Violent shivering that may stop, slurred speech, sluggish thinking, drowsiness |
| Severe | Below 82 degrees F | Shivering stops entirely, loss of consciousness, weak pulse, very slow breathing |
First aid: Move the victim to a warm, sheltered area. Remove any wet clothing and replace it with dry, insulated layers. Wrap them in blankets, sleeping bags, or an emergency space blanket. If they are conscious and able to swallow, give them warm (not hot) liquids and sugary food to help the body generate heat. Rewarm them gradually. Do not plunge them into hot water or place them next to a roaring fire, as rapid rewarming can cause dangerous heart rhythm problems.
Scout Scenario: On a rainy November campout, a Scout gets soaked crossing a stream and doesn’t change clothes because he thinks he’ll dry off. An hour later, he’s shivering uncontrollably and can barely speak. This is textbook hypothermia, and it can happen even in temperatures well above freezing when combined with wet clothing and wind. The NOLS guide to preventing hypothermia is a must-read for any Scout headed into cold weather.
Prevention: Dress in layers (moisture-wicking base, insulating mid, waterproof outer). Avoid cotton, which holds moisture and loses all insulating value when wet (“cotton kills” is a well-known saying in outdoor education). Stay dry, eat calorie-dense foods, and watch your buddies for early signs. If someone starts to shiver, address it immediately before it gets worse.
Mental Health Conditions (Requirement 12)
This requirement recognizes something important: first aid isn’t just for physical injuries. Mental and emotional health are just as real, and a Scout who knows how to support a friend through a stressful or dangerous situation is practicing first aid in the truest sense of the word.
12a) Describe reactions associated with at least three stressful situations.
Stress is your body’s natural response to a challenge or perceived threat. In Scouting, you’ll encounter many situations that can trigger a stress reaction: high-altitude backpacking, rappelling off a cliff for the first time, a ropes course, speaking at an Eagle Court of Honor, taking a swim test, being away from home at camp, or even meeting new people at a jamboree.
Everyone reacts to stress differently, but common physical and emotional responses include rapid heartbeat, sweating, shaky hands, nausea or “butterflies” in the stomach, difficulty concentrating, freezing up or feeling paralyzed, irritability or anger, crying, and withdrawal from others. These are all normal responses. Having a stress reaction doesn’t mean something is wrong with you. It means your brain is taking the situation seriously.
| Stressful Situation | Common Reactions |
|---|---|
| Rappelling or ropes course | Fear of heights, shaky legs, freezing at the edge, rapid breathing |
| Speaking before an audience | Dry mouth, racing heart, blanking on words, sweaty palms |
| Being away from home (homesickness) | Sadness, difficulty sleeping, loss of appetite, withdrawal from activities |
| Trying out for a team or competition | Performance anxiety, nausea, self-doubt, wanting to quit |
Scout Tip: For your counselor meeting, think of a personal example of a time you felt really stressed and what helped you through it. Connecting the requirement to your own experience makes the conversation much more natural and genuine.
12b) Describe the actions that you and others should take to prepare for and manage stressful situations.
Preparation is the single best tool for managing stress. When you know what to expect, practice the skills involved, and have a plan, stressful situations become much more manageable. For example, a Scout who has practiced rappelling on a low wall will feel far more confident at the top of a cliff than one who is trying it for the first time.
Here are practical strategies that work both in Scouting and everyday life:
- Practice and prepare. The more familiar a task is, the less stressful it feels. Rehearse speeches, practice skills, and do dry runs whenever possible.
- Use deep breathing. Slow, controlled breathing (in for 4 counts, hold for 4, out for 4) activates your body’s calming response and reduces anxiety in the moment.
- Break big challenges into small steps. Instead of thinking about the whole cliff, focus on just the next hand-hold.
- Talk about it. Sharing your worries with a buddy, patrol leader, or adult leader takes away some of their power. You’ll often find others feel the same way.
- Support each other. Encourage fellow Scouts who are struggling. A simple “You’ve got this” from a friend goes a long way.
As a leader, you can prepare others by setting clear expectations, creating a safe space for questions, and normalizing nervousness (“It’s OK to be scared, that means you’re paying attention”). The goal isn’t to eliminate stress entirely, but to build confidence in your ability to handle it.
12c) Describe the indications that someone might be a danger to themselves or others.
Mental health crises are medical emergencies, just like a broken bone or cardiac arrest. Unfortunately, suicide is one of the leading causes of death among young people in the United States. As a Scout, you may be in a position to notice warning signs that adults miss, because you spend time with your peers in ways that adults don’t.
According to the Cleveland Clinic, warning signs that someone may be a danger to themselves or others include:
- Talking about wanting to die or kill themselves, or about being a burden to others
- Withdrawing from friends and activities they used to enjoy
- Extreme mood changes, including sudden calmness after a period of depression (which can signal they’ve made a decision)
- Giving away prized possessions or putting affairs in order
- Increased recklessness or substance use
- Expressing hopelessness (“Nothing matters” or “Things will never get better”)
- Self-harm, such as cutting or burning
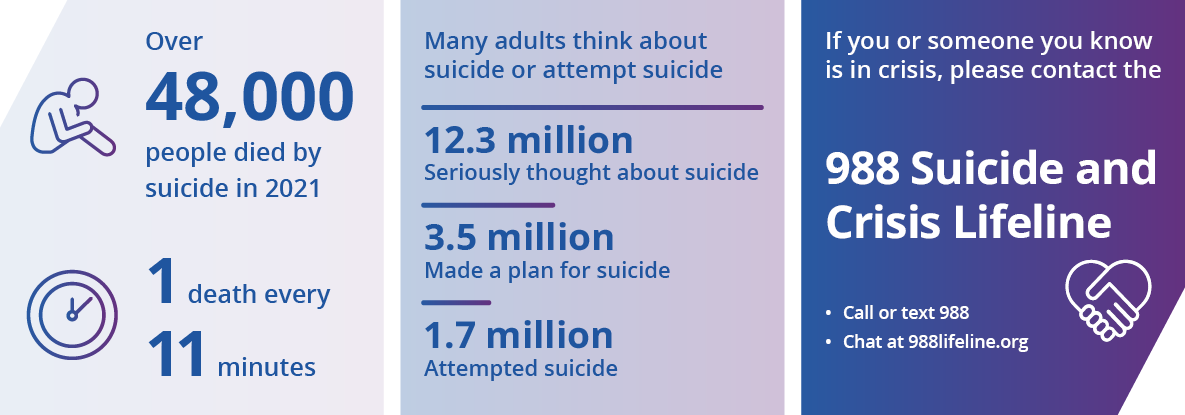
12d) Describe the actions that you should take if you suspect that someone might be a danger to themselves or others.
If anyone is in immediate danger, call 911. Do not try to handle a crisis alone. Your role is to get the person connected to professional help as quickly as possible. If the danger is not immediate but you are concerned, call or text 988 (the Suicide and Crisis Lifeline) or chat at 988lifeline.org for guidance. These services are free, confidential, and available 24/7.
If it is safe for you to do so, stay with the person. Listen without judgment. You don’t need to have the perfect words or “fix” anything. Sometimes just being present and saying “I care about you and I’m here” is the most powerful thing you can do. If possible, gently remove access to anything they could use to harm themselves, such as medications or sharp objects.
Important: In less severe situations, like noticing a friend seems withdrawn or down, you can still make a difference. Let them know support is available. Offer to be a listening ear. Encourage them to talk to a mental health professional, a school counselor, a parent, or another trusted adult. Remain nonjudgmental and express that you are there for them. You don’t have to be an expert to be a lifeline.
Miscellaneous Conditions (Requirement 13)
13a) Describe the symptoms and signs of, show first aid for, and explain prevention of an object in the eye.
Getting something stuck in your eye is common on outdoor adventures, whether it’s dust kicked up on a trail, a wood chip from chopping kindling, or a tiny insect. Symptoms include tearing, redness, a gritty or scratching sensation, pain, and blurry vision. The natural reaction is to rub the eye, but this can actually push the object deeper or scratch the cornea.
First aid: First, wash your hands. If you can see the object on the white of the eye or the inside of the eyelid, try to flush it out by blinking into a cup of clean water or using an eyewash station if one is available. You can also gently pull the upper eyelid down over the lower eyelid, which causes tearing that may wash the object out. If the object is on the cornea (the colored part) or embedded, do NOT attempt to remove it. Cover both eyes loosely with a sterile dressing and get medical help.
Prevention: Wear safety glasses or goggles when doing activities that generate debris (woodworking, fire-building, sawing). On windy, dusty trails, sunglasses help keep particles out. The Mayo Clinic’s eye foreign object guide has step-by-step instructions with illustrations.
13b) Describe the symptoms and signs of, show first aid for, and explain prevention of a broken, chipped, loosened, or knocked out tooth.
Dental injuries can happen during sports, falls, or any impact to the face. A chipped or broken tooth causes sharp edges that can cut your tongue or cheek, while a loosened tooth will feel wobbly and painful. A completely knocked out (avulsed) tooth is actually a time-sensitive emergency, because re-implanting the tooth within 30 minutes gives the best chance of saving it.
For a chipped or broken tooth, rinse the mouth with warm water, apply a cold compress to the outside of the face to reduce swelling, and save any tooth fragments. Avoid biting down on the broken tooth and take an over-the-counter pain reliever if needed. See a dentist as soon as possible.
Knocked-out permanent tooth? Pick it up by the crown (the white part), not the root. If it’s dirty, rinse it gently with milk or water but do not scrub it or remove tissue fragments. Try to place it back in the socket if the person can hold it in place. If that’s not possible, keep the tooth moist by placing it in a cup of milk or having the person hold it between their cheek and gum. Get to a dentist within 30 minutes. The ADA’s dental emergency guide is an excellent reference.
Prevention: Wear a mouthguard during contact sports and activities with fall risk. Avoid chewing ice, hard candy, or popcorn kernels. Wear a seatbelt in vehicles to protect against facial impact in a collision.
13c) Describe the symptoms and signs of, show first aid for, and explain prevention of vomiting and diarrhea associated with food poisoning.
Food poisoning happens when you eat food contaminated with bacteria, viruses, or parasites. On Scout campouts, this most commonly occurs from improper food storage (not keeping cold food cold enough), undercooked meat, or poor hand hygiene during meal prep. Symptoms usually appear within 2-6 hours of eating contaminated food and include nausea, vomiting, diarrhea, stomach cramps, and sometimes fever.
Most cases of food poisoning are unpleasant but resolve on their own within 24-48 hours. The biggest danger is dehydration from fluid loss through vomiting and diarrhea. First aid focuses on replacing those lost fluids: have the person take small, frequent sips of water or an oral rehydration solution. Avoid solid food until vomiting stops. Rest is important.
Call 911 or seek medical attention if: the person has a high fever (above 101.5 degrees F), bloody vomit or stool, signs of severe dehydration (no urination, dizziness, rapid heartbeat), or symptoms last more than 3 days. Also seek help for very young children, elderly individuals, or anyone with a weakened immune system.
Prevention at Camp: Keep cold food below 40 degrees F in a cooler with plenty of ice. Cook meat to safe internal temperatures (use a thermometer!). Wash hands thoroughly with soap and water before handling food. Follow the “2-hour rule”: don’t eat food that has been sitting out at ambient temperature for more than 2 hours (1 hour if it’s above 90 degrees F). The CDC’s food safety page has detailed guidelines.
13d) Describe the symptoms and signs of, show first aid for, and explain prevention of abdominal pain.
Abdominal pain is extremely common and usually not serious. Most cases are caused by indigestion, gas, constipation, overeating, a stomach virus, or menstrual cramps. These typically resolve on their own within a day. Over-the-counter antacids can help with indigestion, and a warm water bottle or heating pad on the abdomen can ease cramping.
However, some abdominal pain signals a medical emergency. Seek immediate medical attention if the pain is severe or sudden, localized to one specific area (especially the lower right side, which could indicate appendicitis), accompanied by a high fever, bloody stool, or persistent vomiting, or if the abdomen is rigid and tender to the touch.
Scout Scenario: On a campout, a Scout complains of stomach pain after dinner. Is it just overeating, or something more serious? Ask them to describe the pain (sharp vs. dull), point to where it hurts, and note if it’s getting worse. A bellyache from too many s’mores is very different from appendicitis. When in doubt, have an adult leader evaluate and be ready to head to the ER.
Prevention: Eat balanced meals, chew food thoroughly, stay hydrated, and avoid eating too quickly. Good hygiene and proper food handling at camp help prevent the stomach bugs that are the most common cause of group-wide abdominal complaints at Scout events.
13e) Describe the symptoms and signs of, show first aid for, and explain prevention of a stroke.
A stroke is a medical emergency that occurs when blood flow to part of the brain is blocked (ischemic stroke) or when a blood vessel in the brain bursts (hemorrhagic stroke). Brain cells begin to die within minutes, so recognizing and responding to a stroke quickly is critical. According to the Mayo Clinic, fast treatment can dramatically reduce brain damage and improve outcomes.
The easiest way to recognize a stroke is the F.A.S.T. method:
| Letter | What to Check | What to Look For |
|---|---|---|
| F | Face | Ask the person to smile. Does one side of the face droop? |
| A | Arms | Ask them to raise both arms. Does one arm drift downward? |
| S | Speech | Ask them to repeat a simple phrase. Is their speech slurred or strange? |
| T | Time | If you see ANY of these signs, call 911 immediately. Note the time symptoms started. |
Watch this video (3:55) from the British Red Cross to see stroke recognition in action:
First aid: Call 911 immediately if you suspect a stroke. Note the exact time symptoms started, as this information is critical for treatment decisions at the hospital. Have the person lie down with their head slightly elevated. Do not give them food or water (their swallowing ability may be impaired). If they become unconscious, place them in the recovery position and monitor breathing. Be ready to perform CPR if they stop breathing.
Prevention: While strokes are more common in older adults, they can happen at any age. Healthy habits like regular exercise, a balanced diet, maintaining a healthy weight, and avoiding tobacco use reduce stroke risk. Knowing the F.A.S.T. signs means you could save a grandparent, neighbor, or stranger’s life someday.
Teaching First Aid with EDGE (Requirement 14)
14) With guidance from your counselor, develop a plan to teach a first-aid skill or topic using the EDGE method.
The EDGE method is Scouting’s framework for teaching any skill. EDGE stands for Explain, Demonstrate, Guide, and Enable. For this requirement, you’ll pick a first aid skill, plan a lesson around these four steps, and then actually teach it to your family or fellow Scouts.
| Step | What You Do | Example (Teaching CPR) |
|---|---|---|
| Explain | Tell your learners what the skill is and why it matters | “CPR keeps blood flowing to the brain when someone’s heart has stopped. Every minute without CPR reduces survival by 10%.” |
| Demonstrate | Show them how to do it, step by step | Show hand placement, compression depth, and rate on a training manikin or pillow |
| Guide | Let them try while you coach and correct | Have each person practice compressions while you check their depth and speed |
| Enable | Step back and let them do it independently | Have them perform a full 2-minute CPR cycle without your guidance |
Tips for choosing your topic: Pick a skill you already feel confident about. Popular choices include treating a burn, applying a bandage or sling, performing the Heimlich maneuver on a choking victim, the RICE method for sprains, or assembling a first aid kit. A troop meeting is a great setting because you have a built-in audience and can often combine this with another Scout’s requirement.
Pro Tip: Write a simple 4-step outline for your lesson before meeting with your counselor. Include what you’ll say during Explain, what you’ll show during Demonstrate, how you’ll let learners practice during Guide, and how you’ll verify they can do it on their own during Enable. Teaching a skill is one of the best ways to master it yourself, so this requirement is a win-win!
Careers and Life Use (Requirement 15)
15) Do ONE of the following: (a) Visit an emergency medical station house or training center. (b) Interview an EMS professional. (c) Research three career opportunities in EMS. (d) Explore how EMS skills apply to a personal hobby or healthy lifestyle.
This final requirement connects your first aid training to the real world. You only need to complete ONE of the four options. Here’s a quick breakdown of each to help you decide which one fits your situation best:
Option 15a: Visit a fire station or EMS training center. This is a fantastic hands-on experience. Many local fire departments and EMS stations are happy to host Scouts. You’ll see the equipment up close, learn about how first responders train, and hear real stories from the people who do this work every day. Prepare a few questions ahead of time.
Option 15b: Interview an EMS professional. This is usually the most flexible option. Ask your counselor, Scoutmaster, or troop committee if they know an EMT, paramedic, nurse, firefighter, or ER doctor who’d be willing to chat. You can do the interview in person, by phone, or even by video call. Prepare 5-7 thoughtful questions about their career path, daily duties, toughest calls, and what advice they’d give to someone interested in the field.
| Sample Interview Questions |
|---|
| What made you choose a career in emergency medicine? |
| What does a typical shift look like for you? |
| What’s the most important first aid skill everyone should know? |
| What’s the toughest part of your job? |
| What training or certifications did you need? |
| What advice would you give a Scout who’s interested in EMS? |
Option 15c: Research three EMS career opportunities. Some options to consider: EMT (Emergency Medical Technician), Paramedic, Registered Nurse (ER), Flight Medic, Wilderness First Responder, or Search and Rescue Technician. For one of these, research the training requirements, typical salary, and career growth opportunities. The Bureau of Labor Statistics is a great starting point for salary and job outlook data.
Option 15d: Explore EMS skills for a hobby or lifestyle. Think about how first aid training enhances activities you already enjoy: backpacking, rock climbing, scuba diving, mountain biking, or even coaching youth sports. Research what additional certifications (like Wilderness First Aid or Wilderness First Responder) could be valuable and what organizations offer them. NOLS Wilderness Medicine is a well-known provider.
Scout Tip: Whichever option you choose, take notes during your visit, interview, or research. You’ll need to discuss what you learned with your counselor, and having organized notes makes that conversation much easier. Think about how the experience connects to what you’ve already learned in this merit badge.
Congrats on Finishing the First Aid Merit Badge!
You just completed all 15 requirements of the First Aid merit badge, and now have the knowledge to assess an emergency scene, treat bleeding, handle breathing crises, perform CPR, splint a fracture, recognize a stroke, and so much more. These are skills that could genuinely save a life, including possibly your own!
The best way to keep these skills sharp is to practice them regularly. Volunteer to lead first aid stations at troop events, help younger Scouts with their Tenderfoot first aid requirements, and consider getting CPR/AED certified through the American Red Cross or the American Heart Association.
If you liked this article, I’d also recommend checking out my guide to the Emergency Preparedness merit badge. First aid training allows you to be a person that your troop and community can depend on when disaster strikes, and emergency preparedness is the perfect next step!
Also, if you’re on the path to Eagle and could use a bit of extra support along the way, be sure to check out some of these other useful articles:
- Your Complete Guide to Scout CPR and AED Training
- The Easiest (And Hardest) Eagle-Required Merit Badges
- Advance Fast in Scouting (5 Rank-Up Keys To Earn Eagle Quickly)
- Leadership in Scouting: A Scout’s Ultimate Guide
I hope this guide has been helpful. Share it with your fellow Scouts, and use it as a reference whenever you need a refresher on your first aid skills. Thanks for reading, and I’m wishing you all the best on your Scouting journey! 🙂