
If you’re wanting to earn the Eagle-required Camping merit badge, you’re in the right place! In this guide, I’ll be providing you with all of the answers that you’ll need to complete your merit badge worksheet. In the process, you’ll also build a lifelong understanding of outdoor techniques to prepare you for any backpacking trek or campout!
You’ve reached part 2 of my ultimate guide to the Camping merit badge! If you’re new to ScoutSmarts, you should first check out part 1 for the answers to requirements 1-2 of the Camping merit badge.
If you’ve just come over from part one, congratulations! You’re one third of the way done. Once you finish this badge, you’ll be equipped with the knowledge needed to safely and comfortably camp in almost any situation. Give yourself a big pat on the back. 🙂
It’s time to get back into it! Take a minute to closely review and think through requirements 3-10 of the Camping merit badge:
What Are The Camping Merit Badge Answers?
- Make a written plan for an overnight trek and show how to get to your camping spot by using a topographical map and one of the following:
a. A compass
b. A GPS receiver
c. A smartphone with a GPS app
(If a GPS-equipped device is not available, explain how to use one to get to your camping spot.) - Do the following:
a. Make a duty roster showing how your patrol is organized for an actual overnight campout. List assignments for each member.
b. Help a Scout patrol or a Webelos Scout unit in your area prepare for an actual campout, including creating the duty roster, menu planning, equipment needs, general planning, and setting up camp. - Do the following:
a. Prepare a list of clothing you would need for overnight campouts in both warm and cold weather. Explain the term “layering.”
b. Discuss footwear for different kinds of weather and how the right footwear is important for protecting your feet.
c. Explain the proper care and storage of camping equipment (clothing, footwear, bedding).
d. List the outdoor essentials necessary for any campout, and explain why each item is needed.
e. Present yourself to your Scoutmaster with your pack for inspection. Be correctly clothed and equipped for an overnight campout. - Do the following:
a. Describe the features of four types of tents, when and where they could be used, and how to care for tents. Working with another Scout, pitch a tent.
b. Discuss the importance of camp sanitation and tell why water treatment is essential. Then demonstrate two ways to treat water.
c. Describe the factors to be considered in deciding where to pitch your tent.
d. Tell the difference between internal- and external-frame packs. Discuss the advantages and disadvantages of each.
e. Discuss the types of sleeping bags and what kind would be suitable for different conditions. Explain the proper care of your sleeping bag and how to keep it dry. Make a comfortable ground bed. - Prepare for an overnight campout with your patrol by doing the following:
a. Make a checklist of personal and patrol gear that will be needed.
b. Pack your own gear and your share of the patrol equipment and food for proper carrying. Show that your pack is right for quickly getting what is needed first, and that it has been assembled properly for comfort, weight, balance, size, and neatness. - Do the following:
a. Explain the safety procedures for:
—I) Using a propane or butane/propane stove
—II)Using a liquid fuel stove
—III) Proper storage of extra fuel
b. Discuss the advantages and disadvantages of different types of lightweight cooking stoves.
c. Prepare a camp menu. Explain how the menu would differ from a menu for a backpacking or float trip. Give recipes and make a food list for your patrol. Plan two breakfasts, three lunches, and two suppers. Discuss how to protect your food against bad weather, animals, and contamination.
d. While camping in the outdoors, cook at least one breakfast, one lunch, and one dinner for your patrol from the meals you have planned for requirement 8c. At least one of those meals must be a trail meal requiring the use of a lightweight stove. - Show experience in camping by doing the following:
a. Camp a total of at least 20 nights at designated Scouting activities or events.* One long-term camping experience of up to six consecutive nights may be applied toward this requirement. Sleep each night under the sky or in a tent you have pitched. If the camp provides a tent that has already been pitched, you need not pitch your own tent.
b. On any of these camping experiences, you must do TWO of the following, only with proper preparation and under qualified supervision:
—I) Hike up a mountain where, at some point, you are at least 1,000 feet higher in elevation from where you started.
—II) Backpack, snowshoe, or cross-country ski for at least 4 miles.
—III) Take a bike trip of at least 15 miles or at least four hours.
—IV) Take a nonmotorized trip on the water of at least four hours or 5 miles.
—V) Plan and carry out an overnight snow camping experience.
—VI) Rappel down a rappel route of 30 feet or more.
c) Perform a conservation project approved by the landowner or land managing agency. This can be done alone or with others. - Discuss how the things you did to earn this badge have taught you about personal health and safety, survival, public health, conservation, and good citizenship. In your discussion, tell how Scout spirit and the Scout Oath and Scout Law apply to camping and outdoor ethics.
Camping Merit Badge Requirement 3:
3. Make a written plan for an overnight trek and show how to get to your camping spot by using a topographical map and one of the following:
a) A compass
b) A GPS receiver
c) A smartphone with a GPS app
(If a GPS-equipped device is not available, explain how to use one to get to your camping spot.)
Since each location differs, it would be a good idea to speak to your merit badge counselor about this one. They can ensure that you are able to properly use your compass, and point you in the right direction as far as camping areas go. You can use topquest.com to find and print a topographical map of the area. Check out this video (3:47) on reading topographical maps!
While you’re able to navigate to your camping spot using a compass, GPS receiver, or smartphone, I would recommend you use a compass to complete this requirement. Navigation is an important skill that very few people are capable of today without the use of their smartphones. 🙂 This video (7:15) gives you a great overview of how to use a compass.
Once you have your map and compass ready, it’s time to write a trek plan! In your plan, it is important to assess the distance, terrain, and weather conditions of your trek. Be sure to note all of these factors beforehand, as well as your estimated duration of the trip. This, as well as a few brief paragraphs of your plans and expectations for the camp, should suffice!
Camping Merit Badge Requirement 4:
4. Do the following:
a) Make a duty roster showing how your patrol is organized for an actual overnight campout. List assignments for each member.
b) Help a Scout patrol or a Webelos Scout unit in your area prepare for an actual campout, including creating the duty roster, menu planning, equipment needs, general planning, and setting up camp.
These requirements can both be easily done within your own troop. Take this opportunity to speak with a troop leader and familiarize yourself with how your troop tends to handle their duty roster. On your next campout, ask your patrol leader for help completing this requirement.
This time, you’ll be in charge! After your patrol has met to plan the next campout, note down each of your patrol members’ duties. That’s your duty roster. Make sure to pack it in your bag, because you’ll be referencing it during your upcoming campout.
During the troop meeting right before your campout, you should also be able to complete requirement 4b by helping plan the menu, evaluating your patrol equipment needs, and helping everyone get organized. After you’ve arrived at the camp, you can finally assist in setting up!
Camping Merit Badge Requirement 5:
5a) Prepare a list of clothing you would need for overnight campouts in both warm and cold weather. Explain the term “layering.”
An important part of being prepared is making sure to pack the right amount of clothing to remain comfortable in any environment. Being too cold on a campout is the worst! On the other hand, you don’t want to overpack and need to carry all that heavy gear around. In this section, I’ll be teaching you the best items to pack for both cold and warm campouts!
Packing for Warm Campouts
In warm, sunny environments, I’d recommend packing the following articles of clothing:
- Sunglasses
- Sunscreen
- A hat
- A light rain jacket or poncho (You never know when the weather could change)
- Suitable footwear
- Extra socks and underwear
- An extra towel (For sun protection or swimming)
- Light, breathable shirts (like a tank top or dry-fit shirt)
Personally, whenever I go camping, I always bring a wide-brimmed hat, a light jacket, a rain jacket, and a pair of extra warm socks. These are items that I find myself using practically every time — regardless of whether the campout is in warm or cold weather! Speaking of cold weather…
Packing for Cold Campouts
In cold, windy environments, I’d recommend packing the following articles of clothing:
- Sunglasses and sunscreen (even in winter!)
- A warm beanie or cap
- A puffy coat or jacket that can protect you from the windchill
- A rain jacket or poncho
- Extra-warm socks (in a pinch, just wear 2-3 pairs at once!)
- Warm long-sleeved shirts
- Gloves or mittens
- Long underwear or thermals
- Clothing that you can easily add or remove for layering
During cold campouts, you’ll obviously need more than just a t-shirt to stay warm. This is why the beanie, socks, and gloves are so useful! In most cases, your body’s warmth will escape from your head, hands, and feet. So, having these articles of clothing will help you to trap in heat. Another way to trap heat close to your body is called layering.
What Is Layering?
Layering means wearing multiple articles of clothing over each other so that you can achieve the right level of warmth. For example, wearing a t-shirt, light jacket, hoodie, and then a waterproof snow jacket over all of that would be considered layering!
Layering can help you to keep warm because your body will heat the inner layers, and you’ll be insulated from the cold by the outside layers. You can even remove or add clothing if you begin to overheat or get too cold. Basically, layering is a great way to easily and precisely control your body’s temperature! 🙂
5b) Discuss footwear for different kinds of weather and how the right footwear is important for protecting your feet.
When determining the right footwear to take on a camp, the main thing you should consider is the environment you’ll be heading into. Does the weather report predict rain? How cold will it get at night? Will it be sunny so that my shoes can dry if they get wet? These are all very important questions to ask yourself when choosing the right camping footwear!
When deciding on what footwear you’ll pack for camp, I’d highly suggest speaking to your Patrol Leader, SPL, or Scoutmaster and asking them their opinion. It’s likely they’ve been on the camp before, and can give you some great pointers! To serve as a general guideline though, below are the best types of footwear for different weather conditions:
- In wet, humid environments: You’ll need to pack light shoes that can be dried quickly and are resistant to moisture damage.
- Slow-drying shoes can mean an increased chance of blisters and foot infections.
- I’d suggest packing a few pairs of extra socks as well.
- In icy environments with snow: you’ll need warm, water-resistant boots with strong traction.
- Slipping and cold feet will probably be your biggest concerns.
- If you’ll be hiking in the snow, I’d suggest using crampons (Amazon link to show you what crampons look like).
- In cold, damp environments: You’ll want to pack insulated, warm, waterproof shoes that will stand up to the outdoor conditions.
- Sturdy waterproof boots are ideal for these kinds of conditions, as they’ll keep your feet dry and warm.
- In warm, mild environments: A light, breathable pair of canvas or hiking shoes will be fine.
- If your troop allows it, you may also want to bring a pair of slippers or sandals to use around camp so that you’ll have a change of footwear if your feet start to get too hot.
Another thing to consider when choosing the right footwear is the type of physical activity your troop will be doing. Will you be running, playing sports, or hiking? If so, you’ll need supportive shoes that can stand up to these tasks. I don’t know what your troop will be doing, so seriously, talk to your Scoutmaster to hear what they recommend. 😉
Failing to choose the right footwear is one of the biggest mistakes that inexperienced campers make. If you’re looking to buy a new pair of footwear for Scouting, there are some key things you must know! To learn more, check out my Complete Guide To Choosing Scouting Footwear.
5c) Explain the proper care and storage of camping equipment (clothing, footwear, bedding).
Keeping your equipment properly cared for will prolong its usability and save you a lot of money in the long run! Proper care means emptying, cleaning, washing, and drying your gear following each campout. After your gear has been cleaned, it should be stored dry and out of direct sunlight, in an area free of pests.
Quick tips when caring for camping gear:
- Funky odors are caused by bacteria. You can reduce the smell and kill the bacteria by washing your equipment and then leaving it in direct sunlight to dry (not for thin/sensitive gear)!
- Always shake out bedding and sleeping mats to remove any twigs, bugs, or debris. These could damage your equipment and cause punctures while in storage.
- If your clothes really smell, you can place them in a bucket filled with a 1/2 cup of baking soda and water overnight. This will eliminate smells like smoke or sweat!
- After washing my shoes with a hose, I always removed the insoles and left them out in the sun to dry. Doing this airs your shoes out and the sunlight kills the bacteria, which beats tossing your dirty shoes into the washing machine.
5d) List the outdoor essentials necessary for any campout, and explain why each item is needed.
Outdoor essentials can vary based on the nature of your camping environment. Once you’ve been camping for some time, you’ll have a better sense of what equipment you commonly use and what to bring. However, the BSA says that 10 essentials should always be on your packing list. These items are known as the 10 Outdoor essentials. Here they are:
The BSA’s 10 Outdoor Essentials
- A Map and Compass (Or some other navigation method)
- A Headlamp
- Sun protection
- A First aid kit
- A Pocket Knife or Multitool
- Firestarter
- A Tent, Tarp, or Other Form of Shelter
- Extra Food
- Extra Water or a Water Purifier
- Extra Clothes and Raingear
I don’t want this article to be too long, as you probably already have a pretty good idea of what gear you take along to campouts. However, for a complete checklist of my favorite 21 essentials to bring camping (and some additional items to impress your friends), check out my Essential Scout Camp Packing List!
5e) Present yourself to your Scoutmaster with your pack for inspection. Be correctly clothed and equipped for an overnight campout.
If you’ve read the previous sections along with part 1 of my guide to the Camping merit badge, by now you should be prepared for an overnight campout. Pack your bag according to the above checklist, look sharp wearing your class-A uniform, and get ready for an amazing camping trip! You’re ready. 🙂
Camping Merit Badge Requirement 6:
6a) Describe the features of four types of tents, when and where they could be used, and how to care for tents. Working with another Scout, pitch a tent.
In this day and age, there are thousands of brands and varieties of tents out there. However, almost all tents can be grouped into 1 of 4 categories based on their shape. Here are the 4 different types of tents: A-Frame tents, Pyramid tents, Hoop tents, and Dome tents. In this section, I’ll be explaining each of the 4 tent types in a bit more detail!
A-Frame Tent
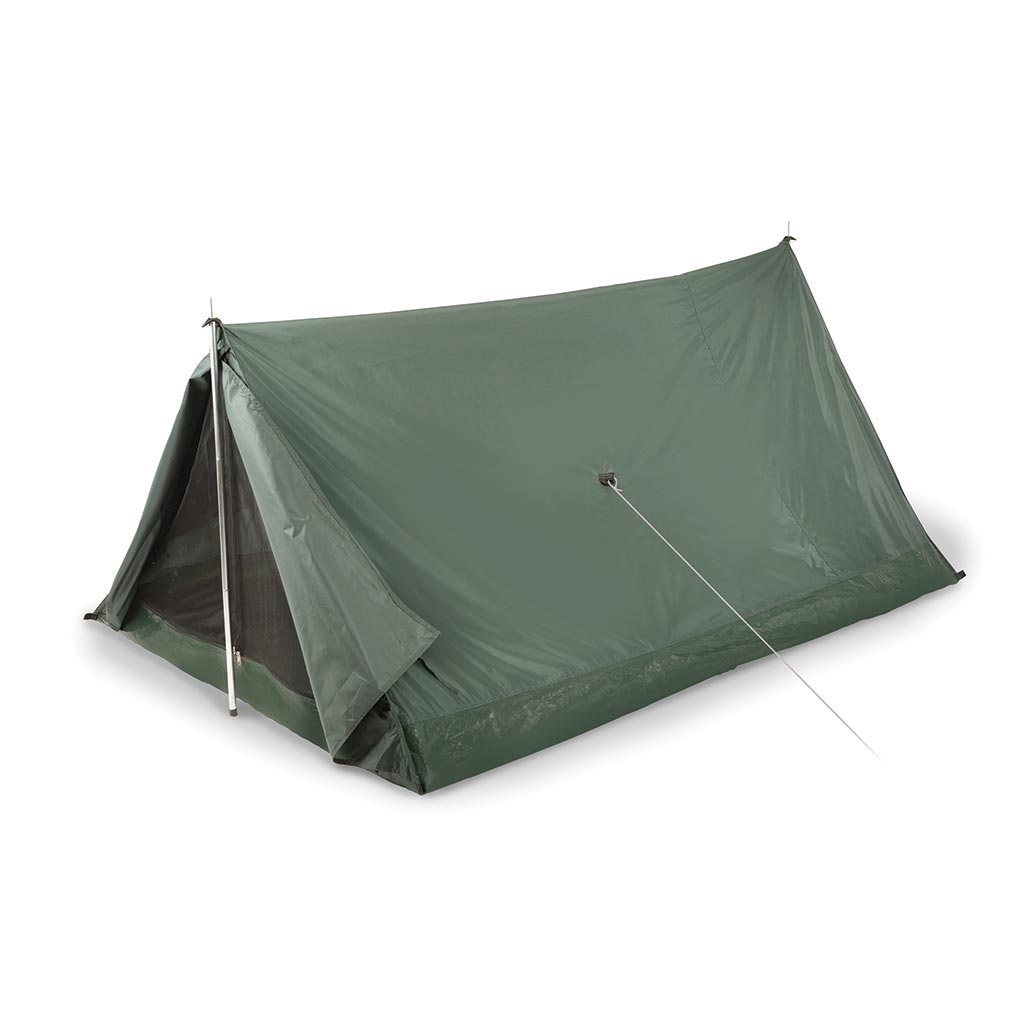
- A-Frame tents: A-Frame tents take on a triangular, “Letter-A” shape and are often supported by a pole on each end. These tents tend to have ample floor area, but not a lot of air space, as the sides slope inward in a triangle shape. These are the tents my troop used, and are generally a popular, inexpensive option for camping!
Dome Tents

- Dome tents: Another very popular type of tent, dome tents are usually made with poles that criss-cross over their middle in a “dome” shape. These types of tents are strong and spacious, so they’re a great option for most conditions. In fact, my current tent is a dome tent!
Hoop Tents
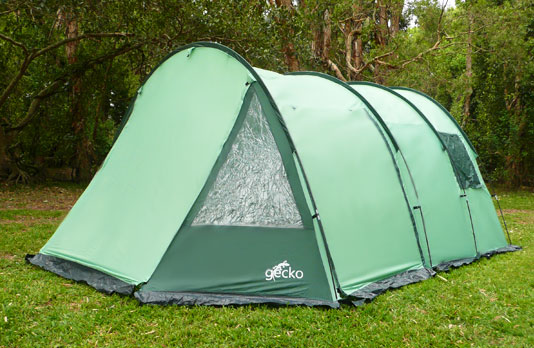
- Hoop tents: Hoop tents create their frame by bending poles in a half-circle and connecting their sidewalls to those poles (the image is a very large hoop tent; most look like that but are smaller). Therefore, most hoop tents only consist of 2 or 3 long poles.
Pyramid Tents
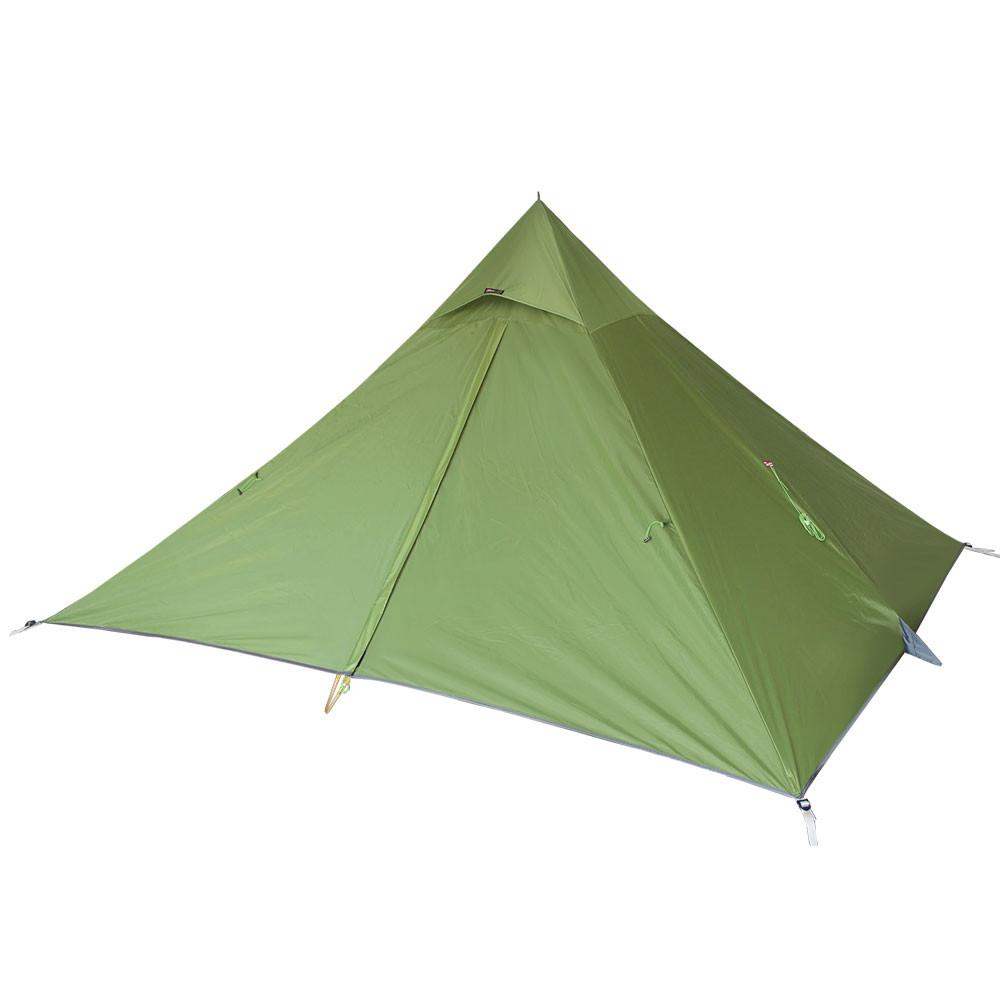
- Pyramid tents: Pyramid tents are supported in their middle by a single pole, with the tent’s fabric being pulled out and pegged on each of its sides. From what I’ve seen, pyramid tents aren’t too popular as a smaller tent type, since the central pole can get in the way. However, I’ve made this structure with a tarp and a hiking pole while backpacking, and it works pretty well in a pinch!
How To Care For Your Tent
An important part of camping is properly caring for your tent after you’re all finished. Remember, you’ll need to sleep in your tent again on the next campout, so you want to make sure it’s kept in great condition!
To keep your tent in great condition, here are a few keys to keep in mind:
- Always make sure your tent is completely dry before storing it. A wet tent will grow mildew, stink, and fall apart much sooner. This is my most important tip, BY FAR.
- When using your tent, always use 2 hands when operating your zippers. Tents are designed to be taut and can tear if you carelessly pull on the zippers without bringing the fabric together.
- Never throw your tent into a washer or clean it with strong soaps. This can ruin the waterproofing. Instead, use water or mild dish soap.
- Never pitch a tent on sticks, sharp rocks, or jagged surfaces. Punctures are more likely than you’d expect.
- Shake your tent out before putting it away. Rolling it up with loose items can also lead to punctures.
After a while, your tent may become so dirty with sap, mud, and gunk that it may require a more complete clean. No worries! I’d recommend watching the quick video (1:52) below to learn how to conduct a thorough cleaning of any tent:
Being able to properly care for your tools isn’t just an important skill for camping — It’ll help you throughout the rest of your life as well! Proper tent maintenance will save you a lot of money and headaches in the long run, so make sure you do this step right. 🙂
6b) Discuss the importance of camp sanitation and tell why water treatment is essential. Then demonstrate two ways to treat water.
What does the 11th Scout Law Principle teach us? A Scout is clean! Camp sanitation is important in preventing foodborne illnesses and insect infestations. Unsanitary camp conditions can lead to consuming spoiled food, which may result in indigestion, food poisoning, or diarrhea.
Since drinking untreated water can cause illness, it’s important to purify it so that it’s suitable for human consumption. When camping, three methods of water purification are typically used:
- Boiling
- Iodine droplets
- Filtration
Demonstrating two of these purification methods should be fairly straightforward. Simply find some clear fresh water and boil it. Then, depending on your equipment, you can either drop an iodine tablet into your remaining water or run it through a pump filter.
When finding water to purify, it’s important to choose the cleanest source of water possible. You should avoid trying to purify murky water unless it’s a last resort, and instead try to purify water from moving streams or large lakes. Also, keep in mind that boiling and iodine tablets won’t remove heavy sediment in your water, so always use a water filter, when possible.
Ready to move on to requirement 6b) of the Camping mb? Click here!
Congrats on Finishing Part 2 of the Camping Merit Badge!
From smart packing to campsite sanitation, we just answered a ton of important questions on your Camping merit badge worksheet, better preparing you to use these essential skills if ever the need arises. Well done, you’re making terrific progress toward becoming an excellent camper! 🙂
Once you’re ready to continue on to part 3 of the Camping merit badge (Requirements 6c-10) click here!
Also, if you’re on the path to Eagle and could use a bit of extra support along the way, be sure to check out some of these other useful articles. You won’t regret it!
- The Easiest (And Hardest) Eagle-Required Merit Badges
- Advance Fast in Scouting (5 Rank-Up Keys To Earn Eagle Quickly)
- 50+ Incredible BSA Scout Facts (To Wow Your Troop)
- The 3 Easiest Merit Badges That You Can Earn
- Leadership in Scouting: A Scout’s Ultimate Guide
Definitely check out any of these articles later on if they interest you! Now, on to part 3 of my ultimate guide to the Camping merit badge!